Cabling is the part of a solar system nobody photographs and nobody asks about in a sales meeting — which is exactly why it’s worth a few minutes of your attention. The wires and connectors are what actually carry your generated power from the roof down to your home, and when they’re undersized, mismatched, or poorly joined, the consequences range from wasted electricity to a genuine fire risk. The good news: there’s not much you need to do about it, but understanding why it’s specialist electrician’s work — not a plug-it-together job — tells you a lot about why a good install costs what it does.
The two sides of solar cabling
A solar system has two distinct electrical halves, and they use different cable:
- DC cabling runs from the panels to the inverter. Your panels produce direct current (DC) at a high voltage, and that cable lives on the roof in full sun for 25 years. So it’s not ordinary house wiring — it’s purpose-built solar cable that’s UV-resistant (so sunlight doesn’t degrade it) and double-insulated (for safety at high DC voltages). Using normal cable here would be both unsafe and short-lived.
- AC cabling runs from the inverter to your switchboard. Once the inverter has converted the power to alternating current (AC), it’s wired to the standard electrical rules, like any other household circuit.
Knowing there are two sides helps a quote make sense: the DC side is the specialised, solar-specific part, and it’s where shortcuts do real damage.
Why cable is specified, not guessed
You can’t just grab “some wire”. Cable for a solar system is deliberately sized to satisfy two separate requirements, and both matter:
- It must carry the current safely. Every cable has a limit to how much current it can carry before it overheats. Solar cable also has to allow margin for a baking-hot roof, where cable carries less safely than in a cool space. Undersized cable that runs hot is a fire risk — this is the safety-critical reason it’s specced properly.
- It must keep voltage drop low. Push current down a too-thin or too-long cable and you lose some of the energy as heat along the way. That’s called voltage drop, and it directly wastes the power your panels worked to generate. Correctly sized cable keeps those losses small, so you actually get the generation you paid for.
So cable sizing is a calculation — based on the current, the run length, and the conditions — not a guess. It’s one of the quiet ways a careful installer protects both your safety and your output.
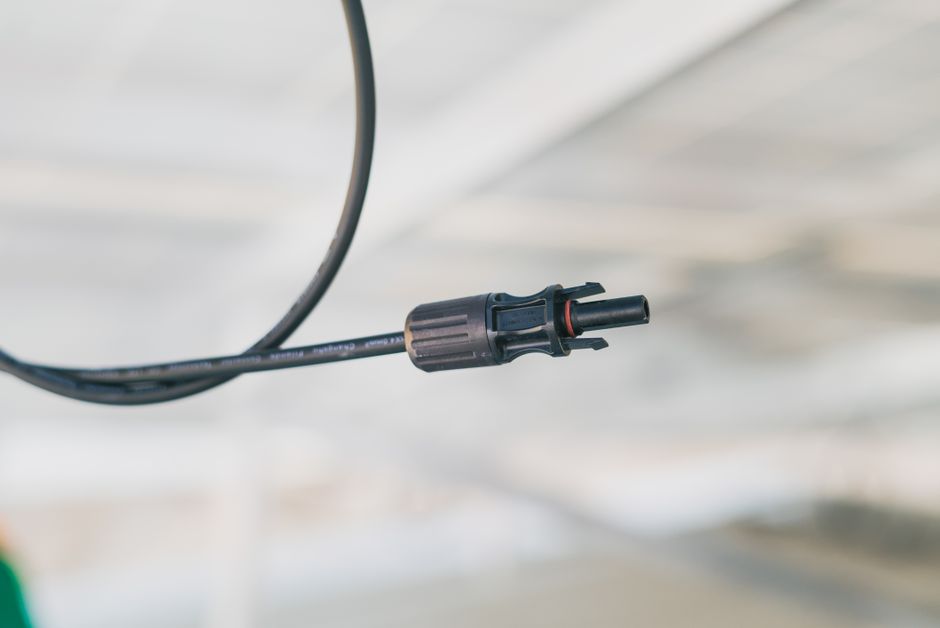
The connectors deserve special mention
If there’s one part of the cabling people underestimate, it’s the connectors. The DC cables between panels are joined with specialised plug connectors — most commonly the MC4 type. These have to be the matched brand and type, and crimped onto the cable with the correct tool. It sounds trivial. It isn’t.
Mismatched or loose connectors are a well-known failure and fire point in solar systems. Two superficially similar connectors from different makers may not mate properly, leaving a high-resistance joint that heats up over time; a poorly crimped connector does the same. On a roof, in the weather, carrying DC current, that’s exactly the kind of fault that smoulders. This is precisely why solar connection is a job for a competent electrician with the right tooling — not a DIY plug-together — and why a cheap, rushed install can leave problems that only surface years later.
What this means for you
There’s very little for a homeowner to do here, which is rather the point — it’s meant to be installed once, correctly, and forgotten. But a couple of things are worth knowing:
- It’s a reason to value the installer, not just the hardware. Good cabling and connector work is invisible in a finished system but vital to its safety and output.
- If you ever smell burning, see scorching near a connector or isolator, or notice a sudden drop in generation, get it checked — don’t investigate live DC connections yourself.
The verdict
The cabling and connectors are the unglamorous nervous system of a solar installation. The DC side uses special UV-resistant, double-insulated cable, sized by calculation to carry current safely and waste as little power as possible; the connectors must be matched and properly crimped, because loose or mismatched ones are a real fire risk. None of it is DIY, and all of it is a reason the quality of your installer matters as much as the brand on your panels.
Go deeper: Solar cable sizing and spec · How solar panels are wired
Sources: DC/AC cable specification, current-carrying and voltage-drop requirements per New Zealand wiring and solar standards; connector failure modes per industry safety guidance. All solar wiring should be done by a registered electrician.